How to Fix Small Crack in Wall Corner between Ceiling And Wall

Have you noticed a small crack forming in the corner where your ceiling meets the wall? It might seem like a tiny flaw, but if left unattended, it can grow into a bigger problem.
You don’t need to call a professional or spend a fortune to fix it. You’ll learn simple, step-by-step methods to repair that crack quickly and effectively. By the time you finish reading, you’ll have the confidence and know-how to restore your wall’s smooth, flawless look.
Let’s get started and tackle that crack together!
Identify The Crack Type
Before fixing a crack in the wall corner, identify its type. Knowing the crack type helps decide the right repair method. Not all cracks are the same. Some are harmless. Others need urgent attention. Understanding the difference saves time and money.
Hairline Vs Structural Cracks
Hairline cracks are thin and shallow. They often look like fine lines on the wall. These cracks usually happen due to drying or minor settling. They do not affect the building’s safety.
Structural cracks are wider and deeper. They may run diagonally or vertically. These cracks can weaken the wall or ceiling. They often show signs of movement or damage inside the building. Fixing structural cracks needs professional help.
Common Causes
Hairline cracks occur from paint drying or small shifts in the wall. Changes in temperature or humidity can cause these cracks. Poor-quality paint or plaster can also lead to hairline cracks.
Structural cracks happen due to foundation problems or building settling. Water damage or poor construction can cause bigger cracks. Heavy loads or vibrations near the building also cause structural cracks. Watch for cracks that grow bigger over time.
Gather Necessary Tools
Before fixing a small crack in the wall corner between the ceiling and wall, gather all necessary tools. Having the right tools makes the job easier and faster. It also helps you achieve a smooth and lasting repair. Prepare everything in one place to avoid interruptions during the work.
Essential Materials
Start with basic materials like joint compound or spackling paste. You will also need a putty knife to apply the compound. Sandpaper helps smooth the surface after drying. A small brush or cloth is useful for cleaning the crack area. Painter’s tape can protect the ceiling and wall edges. A primer and paint might be needed for finishing touches.
Safety Gear
Safety gear is important even for small repairs. Wear safety glasses to protect your eyes from dust and debris. Use a dust mask to avoid inhaling fine particles. Gloves protect your hands from chemicals and sharp tools. Dress in old clothes to keep paint and compound off your skin. A step ladder may be necessary to reach the corner safely.
Prepare The Crack Area
Preparing the crack area is the first step to a smooth repair. A clean and clear surface helps the filler stick better. It also prevents the crack from growing again. Take your time to prepare the area carefully. This will save effort later.
Clean The Surface
Start by wiping the crack and its surroundings. Use a damp cloth to remove dust and dirt. Avoid soaking the area; just a light wipe is enough. A clean surface helps the repair material bond well. Let the area dry completely before moving on.
Remove Loose Debris
Check the crack for any loose paint or plaster. Gently scrape off flakes with a putty knife or a small brush. Remove any particles inside the crack too. Loose debris can cause the filler to fall out. Clearing it out ensures a stronger, longer-lasting fix.

Credit: www.youtube.com
Apply Filler Or Compound
Applying filler or compound is a key step to fix small cracks in wall corners between the ceiling and wall. It smooths out the crack and prevents it from spreading. Filling the crack also prepares the surface for painting. This process requires the right materials and careful application. A good finish looks clean and lasts a long time.
Choosing The Right Filler
Select a filler made for interior walls and ceilings. Lightweight spackling paste works well for small cracks. It dries fast and sands easily. Avoid heavy fillers that take too long to dry. For cracks near moisture areas, use a filler that resists mold. Check the product label for drying time and sanding instructions. Choose a filler that matches your wall texture for the best look.
Step-by-step Application
Start by cleaning the crack with a brush or cloth. Remove dust and loose pieces. Use a putty knife to push the filler into the crack. Spread it evenly and fill the gap completely. Smooth the surface with the knife, removing extra filler. Let the filler dry fully, following product instructions. After drying, sand the area lightly until smooth. Wipe away dust before painting. Repeat filling and sanding if needed for a perfect finish.
Sand And Smooth The Surface
Sanding and smoothing the surface is a key step in fixing a small crack in the wall corner between the ceiling and wall. This process helps remove rough edges and prepares the area for painting or further treatment. A smooth surface blends well with the rest of the wall, making the repair less noticeable.
Take time to sand gently and evenly. This avoids creating new marks or damaging the surrounding wall. The goal is to make the crack area level with the rest of the corner.
Drying Time
Before sanding, allow the filler or patch material to dry fully. This usually takes a few hours but can vary by product. Drying time ensures the material hardens well for effective sanding. Check the product label for exact drying times. Avoid rushing, as sanding too soon can cause damage or uneven surfaces.
Sanding Techniques
Use fine-grit sandpaper, around 120 to 150 grit, for a smooth finish. Sand in small, circular motions to blend the patch with the wall. Light pressure works best to avoid creating dips. Wipe away dust with a damp cloth after sanding. Repeat sanding and cleaning if needed until the surface feels even and smooth.

Credit: www.reddit.com
Prime And Paint
Priming and painting the repaired crack is the last step. It protects the wall and makes the repair invisible. Proper priming seals the surface. It helps the paint stick well. Painting brings back the original look.
Selecting Primer
Choose a primer made for walls and ceilings. Use a stain-blocking primer if the crack had water damage. This stops marks from showing through. Pick a primer that dries fast and covers well. Apply a thin, even coat over the repaired area. Let it dry fully before painting.
Matching Paint Color
Match the paint color exactly to your wall or ceiling. Take a small paint chip or a photo to the store. Ask for a color match service. Test the paint on a hidden spot first. Let it dry to see the true color. Use the same type of paint finish as the original. This keeps the surface looking smooth and uniform.
Prevent Future Cracks
Preventing future cracks in the corner between the ceiling and wall is important. Small cracks can grow bigger if the root causes are not fixed. Taking steps to control moisture and strengthen weak spots helps keep your walls strong and smooth. These simple actions protect your home and save you from costly repairs.
Control Moisture Levels
Moisture causes walls to expand and contract. This movement creates stress that leads to cracks. Keep your home dry to avoid this problem. Use a dehumidifier in damp rooms. Fix leaks in pipes, roofs, or windows quickly. Proper ventilation in bathrooms and kitchens reduces moisture buildup. Check gutters and downspouts to direct water away from your house. Dry walls mean fewer cracks over time.
Reinforce Weak Areas
Weak corners crack more easily under pressure. Strengthen these spots during repair to stop cracks from coming back. Use fiberglass mesh tape over joints before applying plaster or drywall compound. This tape adds extra support and prevents cracks from forming. Apply several thin layers of compound for better strength. Let each layer dry fully before adding the next. Reinforced corners resist movement and stay crack-free longer.
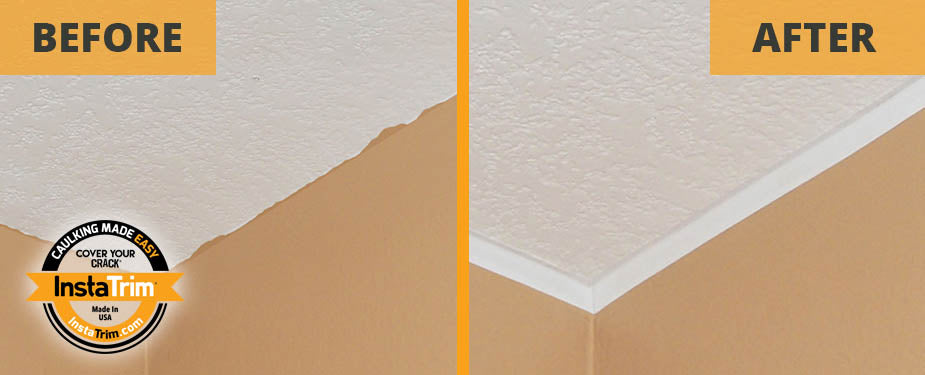
Credit: instatrim.com
Frequently Asked Questions
How Do I Repair A Small Crack In Wall Corners?
To fix small cracks in wall corners, clean the area, apply spackling paste, sand smooth after drying, and repaint. This method ensures a seamless, durable repair.
What Tools Are Needed To Fix Wall Corner Cracks?
You need spackling paste, a putty knife, sandpaper, primer, and paint. These tools help fill, smooth, and blend the crack for a clean finish.
How Long Does It Take To Fix A Corner Crack?
Repairing a small corner crack typically takes a few hours, including drying time. Spackling paste needs time to dry before sanding and painting.
Can I Prevent Cracks Between Ceiling And Wall?
Yes, maintain stable humidity, avoid structural shifts, and use flexible paint or caulk in corners. These measures minimize stress and prevent cracks from forming.
Conclusion
Fixing a small crack in the wall corner is simple and effective. Using basic tools and materials helps keep your walls strong. Regular checks can stop cracks from growing bigger. Taking time to repair cracks improves your home’s look. Small repairs save money and prevent bigger problems later.
Stay patient and follow the steps carefully. A neat wall corner adds to your home’s comfort. Don’t let cracks weaken your walls. Act early, and enjoy a smooth, clean finish every time.